Clip-in Hair Extensions for Thin Hair
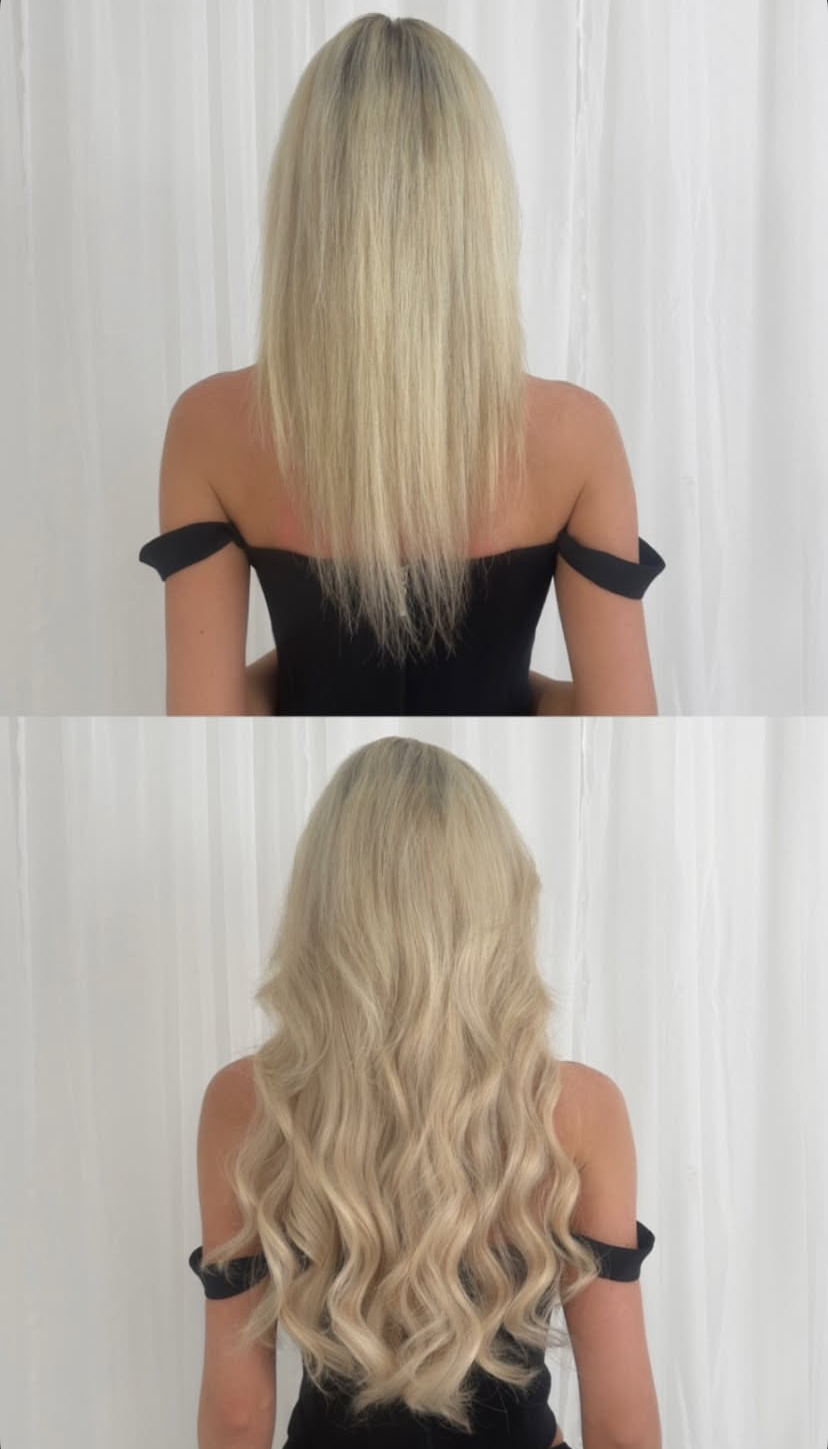
If you've got delicate strands, you know the struggle of wanting that extra oomph without the tell-tale signs of extensions. With fine or thin hair, you need to approach clip-ins a bit differently. Hiding wefts and keeping them secure can seem challenging, but you can achieve the luscious locks you've been dreaming of.
In this guide, we'll outline the step-by-step process for getting the most out of our clip-in extensions for beauties with thin hair like you. Our Seamless range is specially designed with fewer wefts, meaning less weight and more effortless blending. No matter the range you choose, we've got the tricks to make it work for you!
Ready to transform your look into a voluminous masterpiece? Stick with us, and we'll guide you through every step -- from choosing the right extensions to blending them flawlessly. Get ready to turn heads and boost your confidence!
Clip-In Hair Extensions: The Secret to Thicker Hair
For thin hair, you need something that adds volume without weighing you down and blends seamlessly.
So, what's the secret?
Enter the Foxy Locks Seamless range! We've tailored these clip-ins just for you. Here's how:
Lighter Weight: You'll get the luxurious fullness you want that feels as light as your natural hair.
Effortless Blending: Achieve a seamless look with fewer wefts that integrate naturally with your fine strands of hair.
Customisable Volume: Use only the wefts you need to create your ideal look.
If you've fallen head over heels for one of our other ranges, no worries!
PRO TIP: Use only the wefts you need. Customise the set to fit your look.
Whether you go for the Seamless range or customise another set, choose the clip-in extensions that make you feel like the best version of yourself. Let's dive in and discover how to make the most of your clip-in extensions!
How to Put Clip In Extensions in Thin Hair: Step-by-Step Guide

STEP 1: Brushing
Start your transformation by brushing your hair thoroughly. Our Foxy Locks Paddle Brush is your secret weapon here! It's specially designed bristles will leave your hair silky smooth, creating the perfect foundation for your extensions.

STEP 2: Section and Secure
Use your fingers or a comb to create a straight line across your head, just below your ears. Secure the rest of your hair out of the way – this is where those handy hair clips come in.
Now, let's make sure everything fits perfectly. Hold up your first 3-clip weft to the sectioned area. If it's a bit wide, no worries! Just adjust your parting slightly higher.
Once you're happy with the fit, clip the weft just below the parting. This will ensure it can move naturally with your hair and lie flat against your scalp.
PRO TIP: start with the middle clip for a secure hold, then fasten the side clips. This technique ensures your weft moves naturally with your hair and sits flat against your scalp.
To avoid clips slipping, give your roots a quick backcomb or a spritz of dry shampoo or texturizing spray. This adds grip, keeping your extensions in place all day long!

STEP 3: Build the Volume
Create a new section about an inch above the first one. Be sure to keep things tidy by securing the rest of your hair out of the way.
Now, to avoid slipping, you'll want to apply dry shampoo or texturizing spray at the root as you have previously done.
Take your second 3-clip weft and follow the same process as before, starting with the middle clip for a secure and even application.
Seamless range users: you'll skip the next step and head straight to step 5. This set doesn't include the smaller 4-clip weft.

STEP 4: Add the Middle Layer
Section off another half-inch above your last weft. This time, you'll be using the smaller 4-clip weft.
You'll want to brush the weft before clipping it in.
Start in the middle (it's easier that way) and take a moment to ensure it feels secure and comfortable before moving on.

STEP 5: Crown Your Look
Now for the pièce de résistance – the larger 4-clip weft!
This weft goes at the back of your head, just below the crown of your head. For thin hair, place it a bit lower to ensure you have enough hair to cover it.
Repeat the process noted above.
Once you have clipped the weft in, ensure you are happy with how it looks from the back and that the hair is blended thoroughly.
If you feel it's not blending as well as you'd like, try moving it down or leave it out entirely. Remember, it's all about what works best for you!
PRO TIP: Customize your look! If the wefts feel too wide, you can easily trim them. Just cut on either side of the clips along the silicone banding. Don't worry about shedding—our extensions are sealed to prevent that but you can add some superglue along banding where you made the cut if you prefer.

STEP 6: Frame Your Face
Time to focus on those face-framing pieces!
Create a clean, straight section about an inch above your ear, level with the 4-clip weft below your crown.
Clip in your 2-clip weft here following the same process.
Then, add a 1-clip weft just above the 2-clip weft. You'll want this one near your face for that perfect blend.
Once you're happy with the positioning, let down the rest of your hair, ensure all wefts are covered, and blend with your own hair.

STEP 7: Balance It Out
Now, let's create that perfect symmetry. Repeat step 6 on the other side of your head, adding the final two wefts to complete your transformation.

STEP 8: Blend and Shine
Do a final check to ensure all wefts are secure and well-blended and that you are happy with the end result.
Use your paddle brush -- it will not pull excessively on the hair -- to carefully brush through your hair, paying extra attention around the roots.
For that extra touch of glamour, add a few drops of our Gold Hair Oil by Foxy Locks. It'll give your locks a beautiful, healthy shine and help blend your natural hair with the extensions seamlessly.
Congratulations! You've just mastered the art of applying clip-in extensions. Get ready to turn heads with your gorgeous, voluminous locks!
Styling and Blending Tips for Thin Hair
Hair extensions are some of the best ways to spruce up your look, but not everyone is lucky during installation. You may have ended up with a poorly installed hair extension, causing it to bulge and look unnatural. Before tossing them in the bin, however, understand that there may be reasons why your extensions aren’t blending—and that there might be ways to improve them!
One of the biggest problems most women have can be thin and fine hair, and that may be the culprit to your hair extensions woes. You will need to put in a little more work to make your extensions match your hair, but the results will be well worth it.
To rekindle your love and hope for hair extensions, here is a quick guide for you.
Trim your extensions
You might feel it’s a waste to cut extensions you’ve purchased, but layering and trimming will help you achieve the natural flow you're looking for. This makes it difficult to tell where your real hair ends and the extensions begin. For this, you will need the expert touch of a hairstylist.
Curls: Your Secret Weapon
Curls are a great way to blend your extensions because they add volume and disguise any differences in length, making shorter pieces less noticeable for a unified look.
Strategic Placement is Key
For thin hair, you can achieve a better blend by clipping wefts higher up on your head or spreading them farther apart. Apply your wefts slightly lower on your head than you might think to ensure you have enough natural hair to cover the extension clips. Patterns aren’t always consistent, so you have the freedom to choose your own based on what best fits your head size and hair type.
Look for your head’s “safe zone”
The safe zone is the area anywhere below the line of your eyebrows, where your clips will not be seen. Begin by drawing an imaginary circle from one eyebrow to the other; below that circle is where you can clip your extensions without the fear of bulges.
Texturise for Hold
Thin hair can be slippery, making it challenging for extensions to stay put. Before applying each weft, lightly backcomb the root area or spritz with dry shampoo or texturising spray to create the needed grip.
Customise Your Set
You don't always need a full set of extensions, so feel free to use fewer wefts.
Stack your extensions up
This is an easy trick where you simply wear extensions on top of each other to create more volume. Stacking wefts ensures there is ample space to work within your scalp while maintaining a natural look.
These tips will help you enhance your natural locks with clip-in extensions, creating a look that's all you—just with a bit more oomph!
Top Tips for People with Thin Hair
You're now ready to transform your thin hair with the perfect clip-in hair extension! Here's what to remember:
- Practice makes perfect – the more you use your extensions, the easier it becomes.
- Experiment with weft placement to find what works best for you.
- Choose the Seamless range – our Seamless collection, made of real human hair, is designed specifically for thin hair.
- Apply and care properly – correct application and care will keep your extensions looking great for months.
- Start small – begin with fewer wefts and add more as needed for a natural look.
- Add grip – use dry shampoo or texturising spray at the roots to prevent slipping.
- Blend, blend, blend! Always ensure your extensions are blended well for a seamless finish.
Everyone's journey is unique, but as long as you follow our guidelines, you'll master the art of clip-ins in no time. From choosing the right extension to perfecting your application technique, you're on your way to gorgeous, voluminous locks!
Frequently Asked Questions: Clip-in Extensions for Thin Hair
Got thin or fine hair? We’ve answered the most common questions about how to get the best results with Foxy Locks Seamless extensions.
How many wefts should I use for thin hair?
For thin hair, we recommend 3–4 wefts from the Foxy Locks Seamless range. Start with fewer wefts and add more if needed to achieve your desired volume while keeping a natural look.
How do I prevent the extensions from slipping in thin hair?
To prevent slipping, try these tips:
- Backcomb the roots where you'll place the clips.
- Use dry shampoo or texturising spray at the roots.
- Place wefts slightly lower on your head.
Do clip-in hair extensions work for thin hair?
Yes! Clip-in extensions are a fantastic option for thin hair. They add both volume and length without damaging your natural strands. With the right application, they blend seamlessly.
What are the best clip-in hair extensions for thin hair?
The best choice is our Foxy Locks Seamless collection. Look for:
- Lightweight wefts
- Sets with fewer wefts
- Flat, seamless clips designed for thin hair
Will the hair extension clips be visible with my thin hair?
The key is to choose extensions with flat, seamless clips. Our Seamless collection is specially designed for people with thin hair, and therefore, with proper application, the clips will not be visible.
To prevent bulges and ensure the clips are hidden, we recommend placing your wefts anywhere below the line of your eyebrows, which we call the “safe zone”. You should also ensure you have enough natural hair to cover the extension clips. With a proper application technique, you will have a seamless blend.
Will clip-in extensions pull on my delicate strands?
Clip-in extensions should not pull on your delicate strands. When correctly applied, they are designed to add volume and length without damaging your natural hair.
Do you have any tips on how to trim or layer hair extensions so there's no obvious line where my natural hair ends?
Layering and trimming your extensions is one of the best ways to achieve a natural, flawless look. This technique makes it difficult to tell where your real hair ends and the extensions begin. For this, we highly recommend getting the expert touch of a hairstylist, as they have more knowledge of layering and trimming to ensure a perfect blend.
For a simple fix, curling your hair is also a great way to blend your extensions, as it adds volume and disguises any differences in length.
Buy Hair Extensions for Thin Hair
Your hair is your crowning glory, which is why it’s only natural that you pursue what’s best for you. A hair transformation is a necessity, and one of the best ways to do it is through hair extensions. As mentioned, however, not everyone is suited for this choice—until now. With these tips in mind, you can now rock extensions even with fine and thin hair!
If you require quality clip in hair extensions in the UK, Foxy Locks is the place to go. We have been supplying beautiful women all over the world the best products, made with quality Remy hair. We’re proud to serve countless clients, offering not only fantastic hair products but unparalleled customer service. Browse through our products today!
Need help or advice? Talk to our experts.